ESP32 WiFi
Introduction to Networking, ESP32 WiFi, and examples of Webserver, Ngrok tunneling, OTA (Over-the-Air).
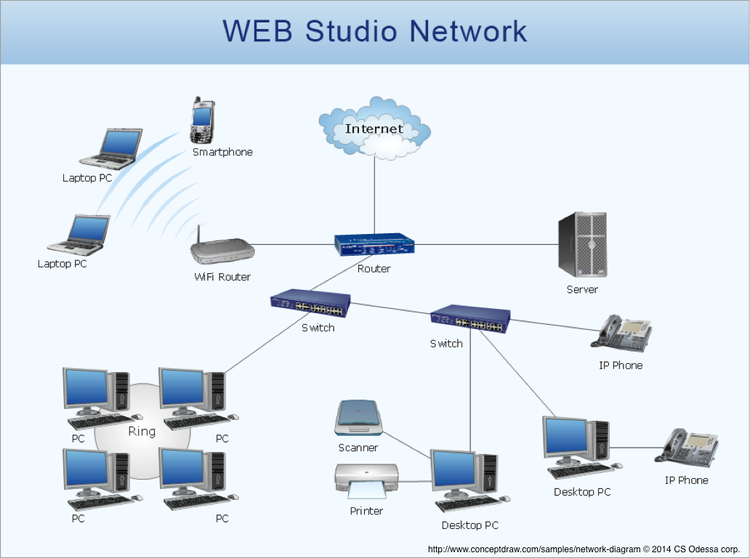
Network
- Home
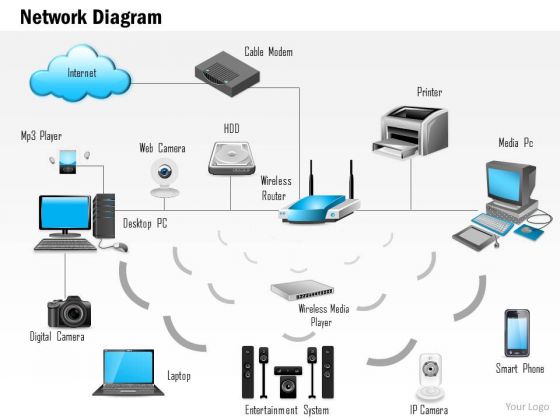
- School/Office
- Hotel

- WiFi Access Point
- Router
- Switch


- Enterprise Router
- ISP (Internet Service Provider)

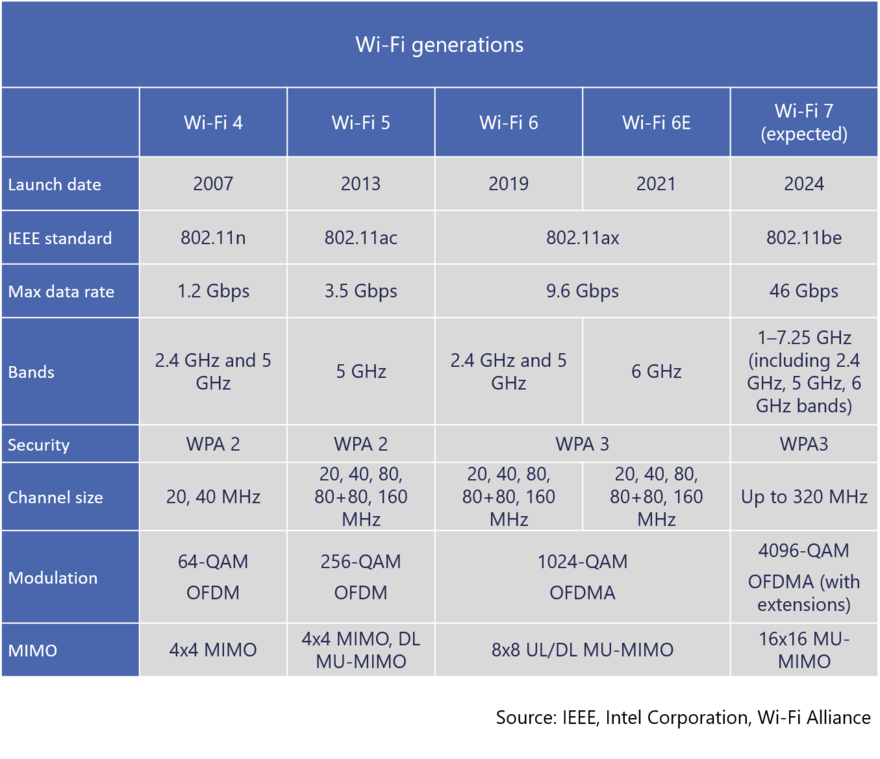
WiFi Generations
ESP32
ESP32 Specification
- Single or Dual-Core 32-bit LX6 Microprocessor with clock frequency up to 240 MHz.
- 520 KB of SRAM, 448 KB of ROM and 16 KB of RTC SRAM.
- Supports 802.11 b/g/n Wi-Fi connectivity with speeds up to 150 Mbps.
- Support for both Classic Bluetooth v4.2 and BLE specifications.
- 34 Programmable GPIOs.
- Up to 18 channels of 12-bit SAR ADC and 2 channels of 8-bit DAC
- Serial Connectivity include 4 x SPI, 2 x I2C, 2 x I2S, 3 x UART.
- Ethernet MAC for physical LAN Communication (requires external PHY).
- 1 Host controller for SD/SDIO/MMC and 1 Slave controller for SDIO/SPI.
- Motor PWM and up to 16-channels of LED PWM.
- Secure Boot and Flash Encryption.
- Cryptographic Hardware Acceleration for AES, Hash (SHA-2), RSA, ECC and RNG.
NodeMCU-32S pinout

WiFi modes
| Syntex | Mode | 功能 |
| WIFI.mode(WIFI_AP) | Access Point(AP) | ESP32可以讓其他設備透過wifi接入(就像家裡的wifi基地台) |
| WIFI.mode(WIFI_STA) | Station (STA) | 無線終端模式,也就是讓ESP32可以連接上其他的熱點 |
| WIFI.mode(WIFI_AP_STA) | AP+STA | 將ESP32設置成兩個模式並存 |
| WIFI.mode(WIFI_OFF) | OFF | 關閉wifi |
[Homework]: ESP32_WiFi_STA.ino
#include<WiFi.h>

const char ssid[]="WiFi網路名稱"; //修改為你家的WiFi網路名稱
const char pwd[]="WiFi密碼"; //修改為你家的WiFi密碼

void setup() {
  Serial.begin(115200);

  WiFi.mode(WIFI_STA); //設置WiFi模式
  WiFi.begin(ssid,pwd);

  Serial.print("WiFi connecting");

  //當WiFi連線時會回傳WL_CONNECTED,因此跳出迴圈時代表已成功連線
  while(WiFi.status()!=WL_CONNECTED){
    Serial.print(".");
    delay(500);
  }

  Serial.println("");
  Serial.print("IP位址:");
  Serial.println(WiFi.localIP()); //讀取IP位址
  Serial.print("WiFi RSSI:");
  Serial.println(WiFi.RSSI()); //讀取WiFi強度


}

void loop() {
}
Examples>WebServer>HelloServer


Sketch>ESP32_Webserver_GPIO


[Homework] ESP32_Webserver_LED.ino
- modify ESP32_Webserver_GPIO to control GPIO2 for on-board LED

Sketch>ESP32_Webserver_Ngrok

[Homework] Ngork tunneling with ESP32_Webserver
- ngrok.com register & download ngrok.exe, & get Your Authtoken
- PC Command Prompt (CMD.exe)
ngork tcp 192.168.1.12:80 --authtoken YOUR_NGROK_AUTHTOKEN

- Open Browser at 0.tcp.jp.ngrok.io:17536 (ngrok tcp address shown in above window)
- If ESP32 running ESP32_Webserver_LED.ino

- If ESP32 running ESP32_Webserver_Ngrok.ino

- If ESP32 running ESP32_Webserver_LED.ino
Sketch>ESP32_Webserver_IoT


Sketch>ESP32_Webclient_IoT_HTU21DF

OTA (Over the Air)
There are a bunch of alternatives for OTA programming with the ESP32 boards. For example, in the Arduino IDE, under the Examples folder, there is the BasicOTA example (that never worked well for us); the OTA Web Updater (works well, but it isn’t easy to integrate with web servers using the ESPAsyncWebServer library);
ESP32 OTA (Over-the-Air) Updates
 OTA (Over-the-Air) update is the process of loading new firmware to the ESP32 board using a Wi-Fi connection rather than a serial communication.
AsyncElegantOTA library
- Install AyncElegantOTA, AsyncTCP, and ESPAsyncWebServer libraries;
- Include AsyncElegantOTA library at the top of the Arduino sketch: **#include
;** - Add this line AsyncElegantOTA.begin(&server); before server.begin();
- Open your browser and go to http://
/update, where is your ESP32 IP address.
Install AsyncElegantOTA Library

Install AsyncTCP and ESPAsyncWebServer Libraries
You also need to install the AsyncTCP and the ESPAsyncWebServer libraries. Click the links below to download the libraries.
AsyncElegantOTA ESP32 Basic Example
Upload this exmaple to ESP32 to start with
#include <Arduino.h>
#include <WiFi.h>
#include <AsyncTCP.h>
#include <ESPAsyncWebServer.h>
#include <AsyncElegantOTA.h>

const char* ssid = "YOUR_SSID";
const char* password = "YOUR_PASSWORD";

AsyncWebServer server(80);

void setup(void) {
  Serial.begin(115200);
  WiFi.mode(WIFI_STA);
  WiFi.begin(ssid, password);
  Serial.println("");

  // Wait for connection
  while (WiFi.status() != WL_CONNECTED) {
    delay(500);
    Serial.print(".");
  }
  Serial.println("");
  Serial.print("Connected to ");
  Serial.println(ssid);
  Serial.print("IP address: ");
  Serial.println(WiFi.localIP());

  server.on("/", HTTP_GET, [](AsyncWebServerRequest *request) {
    request->send(200, "text/plain", "Hi! I am ESP32.");
  });

  AsyncElegantOTA.begin(&server);    // Start ElegantOTA
  server.begin();
  Serial.println("HTTP server started");
}

void loop(void) {
}


Sketch > Export Compiled Binary
- Copy the code and modify:
#include <AsyncElegantOTA.h>AsyncElegantOTA.begin(&server);- revised: ESP32_Async_OTA_Web_Server_LED.ino
- Save your sketch: File > Save and give it a name. For example: [eb_Server_LED_OTA_ESP32.ino(https://raw.githubusercontent.com/RuiSantosdotme/Random-Nerd-Tutorials/master/Projects/ESP32/AsyncElegantOTA/ESP32_Web_Server_LED_OTA/ESP32_Web_Server_LED_OTA.ino)
- Generate a .bin file from your sketch. Go to Sketch > Export Compiled Binary. A new .bin file should be created under the project folder.

- Now,youneed to upload that file using the ElegantOTA page. Go to your ESP IP address followed by /update. Make sure you have the firmware option selected. Click on Choose File and select the .bin file you’ve just generated.

- When it’s finished, click on the Back button.

- Then, you can go to the root (/) URL to access the new web server.

ESP32-PCA9685 Async OTA WebServer

ESP32_PCA9685_Async_OTA_WebServer.ino

This site was last updated June 01, 2023.